How to Choose the Best WordPress Theme

How to Choose the Best WordPress Theme

Unlock the Secret to Online Success: Choose the Right WordPress Theme Today!

Choosing the best WordPress theme for your website can seem like a daunting task given the number of themes available, but it doesn’t have to be. Discover the undeniable power of selecting the perfect WordPress theme and why it’s essential to the success of your business. In this post we are going to help you narrow your choices dramatically, enabling you to choose from a few select themes instead of searching through the thousands that are available.

Check Out Our YouTube Video: “The Ultimate Theme for WordPress: Why I Use Divi and You Should Too!”

Are You Ready to Skyrocket Your Online Sales or Brand Presence?

It’s time to harness the power of the right WordPress theme!

  • Boost Conversions: Selecting the perfect WordPress theme can dramatically increase your conversion rates, turning casual visitors into loyal customers.
  • Build Trust and Credibility: An expertly chosen theme establishes your authority as a sales copy expert, making potential clients more likely to trust and invest in your services.
  • Save Time and Effort: Choosing the right WordPress theme streamlines your workflow, ensuring a seamless user experience and easy navigation, so you can focus on what really matters – writing killer sales copy!
  • Stand Out from the Crowd: A unique and professionally designed WordPress theme sets you apart from your competitors, giving you a powerful competitive edge.
  • Maximize Your Revenue: The right WordPress theme not only attracts more clients but also maximizes the value of each client, resulting in higher profits and long-term success.
WordPress Themes
WordPress Themes

Consider Your Skill Level

Many themes include builders that make it easier for you to design your pages, but not that is not always the case. If you are a designer you will be able to choose from a much larger selection, but if you have limited knowledge of HTML, CSS, and PHP, we highly recommend choosing a theme that includes a page builder.

What is the Purpose of Your Website?
There are themes designed for a specific type of business, and one of them may be perfect for your website if it includes the right page builder. However, a general WordPress theme can usually be used to create the same type of website but may require a little more work and creativity on your part.

KNOW YOUR…

  • Self
  • Skills
  • Budget

The Process of Elimination

Let’s start by eliminating themes that do not:

  • HAVE A LOT OF SALES
  • Include a page builder
  • Offer free support
  • Create mobile-friendly pages

“Choosing the best WordPress theme is much easier when you first eliminate all of the themes that are not suitable.”

WordPress Security
Choose a Secure WordPress Theme

Why You Need to Choose a Popular Theme

You may have been looking at the sales numbers for certain themes and thought one with a low number of sales is perfect. After all, your site will be one of the few website using that theme, so it will be quite unique when you make a few modifications to the design, but that is actually a very bad idea, so you need to learn How to Choose the Best WordPress Theme to avoid huge problems in the future.

Why You Have to Choose a Popular Theme

Just like with any product or business, the theme maker needs to make a living. If the one you choose is not generating many sales it is very unlikely the person or company that created it will continue to maintain it.

If the theme is not updated your site is either going to become a security risk for you and your visitors or become incompatible with future WordPress versions and the plugins you use, which could cause a variety of issues, such as your site going down.

When you can no longer use the theme you will need to migrate your site to a new one, and this can often be much harder and more expensive than it was to build the initial site. Many WordPress themes use features and coding unique to the person or company that created it, making a clean and simple migration virtually impossible.

Important Theme Features

  • POPULAR SELLER
  • Page Builder
  • Free Support
  • SEO Friendly
  • Flexible Design
  • Mobile Friendly
Top Ten Features of a Great WordPress Theme

Top Ten Features of a Great WordPress Theme

The Top Ten Features a WordPress Theme Should Include

The process of choosing the best WordPress theme for your website can be challenging, especially considering the fact that there are thousands of themes currently on the market. We have developed a list of the top ten qualities that a WordPress theme ought to possess in order to assure the success of your website in order to make the process of making a decision less difficult for you. These elements address fundamental areas such as design, performance, user experience, and security.

1. Responsive Design

Importance of Mobile-First Approach

In a mobile-first world, responsive design is vital. A WordPress theme must adapt to many screen sizes and provide a great user experience on desktops, tablets, and smartphones since mobile devices currently make up most web traffic, which is why a Mobile-Friendly Website Design is essential.

Adapting to Different Screen Sizes

Optimizing a website for different screen widths is sometimes forgotten while developing it. A responsive theme adjusts its layout, graphics, and typography to fit any display. This makes your website look good and work well on all devices.

Any modern website needs a responsive theme to deliver a consistent user experience across devices. By utilizing a responsive theme, you can ensure that your website looks amazing and works well for all users, regardless of their device.

2. Customization Options

Color and Font Customization

A good WordPress theme should let you customize your website’s look. These options should include straightforward color pickers for various elements and a wide range of fonts to match your brand’s unique personality.

You may easily create a website that matches your brand and attracts your target audience with such tools. These customization choices allow you to build a cohesive design that matches your branding strategy, improving your website’s visual appeal and user engagement.

Layout and Widget Customization

A good WordPress theme should give you plenty of layout modification choices in addition to color and font tweaking. This should have many header, footer, widget, and sidebar options.

These customization options let you build a website that looks distinctive and meets your demands. Customizing your website layout can make it more engaging and intuitive for visitors. So, having a strong online presence requires a flexible theme that lets you develop a custom design that matches your brand’s vision.

3. SEO-Friendly

Clean and Optimized Code

Websites that want greater search engine rankings must be SEO-friendly. A well-designed and optimized theme helps search engine bots crawl your website. Clean, structured code improves website loading speed, which is important for SEO rankings.

An SEO-friendly theme that’s easy for search engine bots to crawl can boost your website’s rankings and traffic. Clean and structured code ensures a fast loading time, which engages visitors and keeps them on your site longer. Hence, while developing a website, select an SEO-friendly and well-optimized theme. There are additional methods you can use to Boost Your SEO with WordPress and improve your rankings in search engines like Google and Bing.

Schema Markup

Schema markup-supporting themes improve SEO. This markup helps search engines understand your website’s content and structure, resulting in rich snippets. Rich snippets may boost click-through rates and organic traffic.

Schema markup gives search engines more context and information about your website’s content, improving search results. This improves user experience and increases website clicks. To maximize SEO, your website should have a schema markup-supporting theme.

4. Speed and Performance

Lightweight and Well-Optimized

Fast-loading websites improve user experience and SEO. So, a lightweight, performance-optimized theme is essential. Avoid themes with too many features and plugins, which can slow down your website.

Slow-loading websites decrease engagement and increase bounce rates. Slow-loading websites may rank worse in SEO rankings since search engines factor in loading speed. To ensure fast loading speeds and a smooth user experience, your website must have a lightweight and optimized theme.

Compatibility with Caching Plugins

Your theme should also be compatible with popular caching plugins to enhance your website’s performance further. Caching plugins store static versions of your website’s content, reducing server load and improving loading speed for returning visitors.

5. Browser Compatibility

Testing on Different Browsers

Users access your website through various browsers, so your theme must look and function consistently across different browser environments. Developers should test their themes on popular browsers like Google Chrome, Mozilla Firefox, Safari, and Microsoft Edge to ensure compatibility.

Ensuring Consistent User Experience

Browser compatibility ensures that your visitors enjoy a consistent user experience, regardless of the browser they use. This consistency helps build trust and credibility with your audience, increasing the likelihood of repeat visits and conversions.

6. Support and Documentation

Reliable and Accessible Support

Good support is crucial when selecting a WordPress theme. Opt for a theme developed by a reputable team that offers timely and helpful support via multiple channels, including email, live chat, and support forums.

Comprehensive Documentation

A theme should come with detailed documentation covering installation, customization, and troubleshooting. This documentation should be easy to understand, even for beginners, ensuring that you can get your website up and running with minimal hassle.

7. Security and Regular Updates

Built-in Security Features

Choose a secure WordPress theme to protect your website from hackers and dangerous code. When choosing a theme, emphasize those with built-in security measures like regular updates, clear and well-structured code, and compatibility with popular security plugins.

Selecting a safe theme that receives regular updates reduces the danger of your website being hacked. A theme with clean and well-structured code can also assist prevent harmful code from being inserted and improve website security.

Selecting a theme that is compatible with popular security plugins can provide another degree of security to your website. A safe WordPress theme protects your website from threats and weaknesses.

Frequent Updates

Developers must routinely update themes to fix security and compatibility issues. Frequent updates keep your theme up-to-date with WordPress features and best practices. To maintain website security, compatibility, and functionality, use a theme from a developer who routinely delivers updates.

Website security and functioning depend on regular upgrades. Developers can lessen the risk of website hacks and technical issues by quickly fixing security and compatibility concerns. Staying current with WordPress features and best practices can improve your website’s performance and longevity.

8. E-commerce Compatibility

WooCommerce Integration

If you want to sell products or services on your website, be sure your theme supports e-commerce. WooCommerce is WordPress’s most popular e-commerce plugin, so choose a theme that integrates with it.

E-commerce compatibility can boost your website’s functionality and improve your clients’ experience. You can centrally manage your online store’s inventory, orders, payments, and delivery with WooCommerce. This saves time and lets you concentrate on other business matters.

Consequently, while choosing a website theme, emphasize those that support e-commerce and WooCommerce integration. This can help you build a solid online store and succeed in e-commerce.

Other E-commerce Solutions

A good theme should support WooCommerce, Easy Digital Downloads, and Shopify. This lets you choose the platform that best suits your needs. When developing your website, select a theme that works with multiple e-commerce providers. In the competitive world of e-commerce, this might give you flexibility and variety.

Using a theme that supports many e-commerce platforms lets you easily link with your platform and manage your online store. This can help you grow your business and reach more customers, boosting revenues.

9. Page Builder Compatibility

Integration with Popular Page Builders

Choose a theme that works with Elementor, Beaver Builder, and Divi while developing your website. This makes custom layouts and designs easy without coding.

Using a page builder-compatible theme streamlines website construction and customization with a drag-and-drop interface. This saves time and lets you focus on other business matters. Choose a website theme that supports popular page builders. This allows you to easily develop a bespoke layout that matches your brand’s identity and vision.

Custom Modules and Elements

For popular page builders, some themes allow you to add modules and elements created by third-parties. These custom modules make it easy to add fresh, compelling content to your website.

Custom modules and parts, such as widgets and page templates, provide you many options for producing visually appealing and engaging content. This can help your website stand out from the competition and attract and retain visitors.

A wide selection of modules and elements for popular page builders are necessary because they allow you to rapidly and simply produce dynamic and engaging content, improving your website’s user experience.

10. Accessibility

Adhering to Accessibility Standards

Accessibility ensures that all visitors, including those with disabilities, may use your website. So, a theme that meets Web Content Accessibility Guidelines is essential (WCAG). Keyboard navigation, color contrast, and picture alt text are essential for an accessible theme. These elements can improve your website’s accessibility and usability for disabled visitors.

By using a WCAG-compliant theme, you may make your website accessible to all users. This can boost user engagement and satisfaction, boosting traffic and transactions.

Easy Navigation for All Users

An accessible theme should offer easy navigation for all users, including those using screen readers or other assistive technologies. This helps make your website more inclusive and user-friendly, catering to a wider audience and potentially increasing your website’s reach.

Remember, the Goal is to Select the Right WordPress Theme for Your Business or Personal Website, so Choose Carefully

Online success depends on choosing the correct WordPress theme. Emphasize themes with responsive design, customization possibilities, SEO-friendliness, speed and performance, browser compatibility, support and documentation, security and regular updates, e-commerce compatibility, page builder compatibility, and accessibility. Doing so will ensure your website provides a great user experience while following web development and design best practices.

WordPress Logo Light
WordPress Logo Blue
WordPress Logo Dark
WordPress Logo Orange

Final Thoughts

Careful planning and perfect execution of that plan will go a long way towards ensuring your success, so take your time throughout the process. Be smart, do your research, KNOW your goal and create a plan to reach that goal. Don’t be afraid to reach out to family, friends or professionals for advice or assistance, but remember you are the boss, so be the boss and make good well-informed choices.

Summary

  1. Choose a Popular WordPress Theme
  2. Choose a Theme That Matches Your Skill Set
  3. Make Sure Free Support is Available
  4. View Sites That Use the Theme

Disclosure: You may find affiliate links to beneficial resources within this article. You won’t pay more for using our link, but we’ll get a commission. This supports our content creation, and we only suggest products we genuinely believe in. Thank you for being so understanding!

Affiliate Links

James Turner

James Turner

Author/Copywriter

Are you looking for a tech blogger and sales copywriter who can turn your message into a powerful tool for persuasion? Look no further than James Turner, a seasoned professional with over 25 years of experience in the tech industry. With a deep understanding of how to craft words that connect with readers and drive results, James is a master of the art of persuasive writing.

Why Choosing the Best Web Hosting Company Matters in 2025

Find out why choosing the best web hosting company matters in 2025 to boost your site’s performance and skyrocket sales.

Hiring a Website Designer

Hiring a website designer? Discover actionable tips, red flags to avoid, and how to find the right designer to create a website that grows your business.

How to Create a Landing Page Using WordPress

Follow our guide on how to create a landing page using WordPress and the built-in Block Editor, page builder plugins, or specialized themes.

Essential WordPress Plugins for Every Website

Essential WordPress Plugins for Every Website

Every Website Should Be Using These WordPress Plugins for Security, Performance, and Backups

WordPress websites need the right plugins to improve performance and functionality. Our list of essential WordPress plugins covers security, performance, backup, and functionality. These plugins offer firewalls, two-factor authentication, SSL certificates, image optimization, caching, and backup, which can speed up your website, secure it, and add functionality to make it stand out.

Essential Plugin Categories

  • Security
  • Performance
  • Backup
  • Functionality
WordPress Security Plugins
“Search engines like Google rank sites on many factors, but the most important factor is user experience. If a website is slow or insecure, you will be unable to achieve the #1 goal of your site, to attract visitors.”
WordFence Security Plugin

#1: WordPress Security Plugins

An insecure website is bad for you and your visitors, and a surefire way to get your site removed from Google. However, securing your site with a WordPress security plugin is not that hard, it just takes a little effort on your part. There are many good plugins available to secure your site, but we recommend WordFence since it offers several great features to help keep your site secure. For more recommendation check out our article on the Top WordPress Security Plugins for 24/7 Website Protection.

WordFence plugin features:

  • WordFence’s web application firewall protects against SQL injections, brute-force assaults, and XSS attacks.
  • The plugin’s powerful malware scanner continuously scans your website for malware. WordFence alerts you to malware.
  • Two-factor authentication, login restriction, and CAPTCHA protection are among WordFence’s login security options.
  • WordFence sends real-time email and SMS alerts for suspicious website activity.
  • If you suspect malicious traffic, you can block certain countries from accessing your website.
  • WordFence lets you block IP addresses, user agents, and referrers that repeatedly access your website.
  • WordFence monitors your website’s files for unauthorized changes and alerts you immediately.
  • WordFence scans your website’s user accounts for data breaches and prompts you to reset passwords.
  • Two-factor authentication can add security to your website’s login.
  • WordFence works with WordPress Multi-Site, making it easy to secure multiple sites from one dashboard.
  • WordFence scans your website’s plugins for known vulnerabilities and alerts you.
  • WordFence’s Threat Defense Feed updates your website’s security in real time.
  • WordFence provides a firewall, malware scanner, login security, security notifications, advanced blocking, file integrity monitoring, leaked password protection, two-factor authentication, and plugin vulnerability scanner. Its real-time threat defense feed protects your website from new threats and vulnerabilities.

Installing WordFence is easy, just go to your dashboard, click plugins, add new, then type WordFence in the search box.

Our Top 7 WordPress Security Plugins

Let’s dive into some of the handy security features packed with WordPress plugins. One major feature you should look for is a firewall working at the server level (see WordFence above). Pretty cool, huh? This isn’t your everyday firewall; it’s the kind that puts a steel-clad barrier between your site and those pesky cyber threats. Some plugins also got this handy malware scanner that’s a real lifesaver.

That’s not all, though; how about security activity auditing? It’s like having an all-seeing eye, keeping track of all the action on your site. Plus, you’ve got this thing called file integrity monitoring. Imagine getting a heads-up whenever a cheeky intruder tries to tweak your site’s files. Some plugins even bundle all these fantastic features, plus stuff like 2-factor authentication, into a sweet little package. So, with all these features at your disposal, you can be confident your WordPress site’s as secure as a bank vault. Sit back, chill, and let your plugin handle the heavy stuff.

  1. Wordfence Security: A top-tier choice when it comes to security plugins. Its real-time threat defense feed keeps your website safe around the clock from malicious attacks and potential security breaches. Read the detailed description above for more information on this essential WordPress security plugin.
  2. iThemes Security: Designed to secure and protect your WordPress site, iThemes Security fights off automated attacks and strengthens user credentials. It’s a virtual bouncer, keeping the bad guys at bay.
  3. Sucuri Security: Going beyond the standard, Sucuri offers multiple layers of defense. Their active security monitoring and malware cleanup service make your WordPress fortress almost impregnable.
  4. All In One WP Security & Firewall: Exactly as its name suggests – a comprehensive solution. This plugin balances functionality and user-friendliness, making website security less of a chore and more of a delight.
  5. Jetpack Security: From the creators of WordPress itself, Jetpack Security ensures your website flies high above the turbulent seas of web insecurities. It’s your website’s personal superhero.
  6. BulletProof Security: Armed with login security, database backup, anti-spam and more, BulletProof Security shoots down potential threats before they even have a chance to harm your site.
  7. SecuPress Free — WordPress Security: Making security easy, SecuPress is the friendliest bodyguard your website could wish for. Its intuitive interface and powerful features make securing your WordPress site a breeze.
W3 Total Cache
W3 Total Cache WordPress Performance Plugin

#2: WordPress Performance Plugins

Studies show people expect a page to load in only 2-3 seconds and that there is a dramatic increase in page abandonment rates for every additional second it takes your page to load. Studies also show that people are hesitant to return to a site after experiencing issues such as slow loading times.

How Do I Improve The Performance of My Website?

The first thing you need is obvious but not covered here in this blog post, and that is a good web host. However, the good news is you do not need an expensive host or a dedicated server.

We have optimized many websites to load fast on shared servers with cheap hosting accounts. You need the right combination of plugins and a web host that will allow you to install plugins and possibly edit your .htaccess file.

Essential Performance Plugins

  • Cache
  • CSS Minify
  • JS Minify
  • Compression (gzip)

There are of course other types of performance plugins that may or may not be useful for your site, but we are focusing on “essential” plugins here in this article and these are four areas you will need to address to ensure your site loads fast.

W3 Total Cache

This is our favorite WordPress performance plugin since it addresses all of the areas listed above. However, we do not always use this plugin for compression, as we occasionally have issues with this particular feature. We recommend enabling gzip compression and doing a Google PageSpeed test to determine if it works appropriately for your site.

At My Island Designs, we are big fans of W3 Total Cache and have used it to achieve very good Google PageSpeed and Pingdom website speed test scores for countless sites.

You can install W3 Total Cache from within your WordPress dashboard. To configure this plugin, we recommend reading “The Ultimate Guide To W3 Total Cache Settings.”

The Top 5 WordPress Cache Plugins

In the fast-paced world of the web, speed is king. Users crave quick, responsive experiences, and search engines reward websites that deliver them. If your site runs on WordPress, an effective cache plugin is your secret weapon in this race against the clock. Here, we’ve curated the top 5 WordPress cache plugins that combine performance, simplicity, and robust features to give your site that much-needed speed boost. Let’s dive in to find your next speed enhancer.

  1. W3 Total Cache: This WordPress plugin is like the Swiss army knife of caching. It does it all, from minifying your HTML, CSS, and Javascript files, caching database queries, and enabling a content delivery network for your static files. Its comprehensive feature set makes it a favorite among WordPress power users.
  2. WP Super Cache: If simplicity is your game, WP Super Cache is your name. This WordPress cache plugin focuses on delivering the most bang for your buck with as little hassle as possible. It’s easy to set up and delivers speed improvements right out of the box.
  3. WP Rocket: WP Rocket is your ticket to the fast lane. Unlike many other plugins, it offers a user-friendly interface and configuration process. In addition, it comes with various features like Lazy Load, Preloading, and Database Optimization, to speed up your website’s load times dramatically.
  4. Cache Enabler: This cache plugin takes a lightweight approach to speed up your website. It’s ideal if you’re looking for a straightforward solution to set up and offers minimal clutter. The bonus? It’s one of the few plugins that supports WebP!
  5. LiteSpeed Cache: You’re in luck if your web server runs on LiteSpeed. This cache plugin offers an all-in-one site acceleration plugin, featuring an exclusive server-level cache and a collection of optimization features. Its deep integration with LiteSpeed servers makes it incredibly efficient. We highly recommend using this plugin if your website is hosted on a LiteSpeed server. Although many of the features will work on other servers, we have personally used it on LiteSpeed servers, and the results were amazing.

Learn How to Add Plugins to Your WordPress Website in a Few Simple Steps! Watch Our YouTube Video

WordPress Compression Plugin

Gzip compression reduces the size of files delivered to a visitor’s browser, which decreases page load time. Compression is also one of the tests Google PageSpeed performs, which may also be used as a ranking factor.

If your Cache of choice does not compress all of your content, we recommend using the GZip Ninja Speed plugin for compression, and it can be added to your site from within your dashboard.

WordPress Functionality Plugins

WordPress Backup Plugins

#3 WordPress Backup Plugins

All-in-One Migration: Backing up your site is an essential part of maintaining your WordPress website. If your site is every hacked or crashes due to a WordPress or plugin update you will be glad you have a backup of your files and database.

We recommend regular backups, but the frequency depends on how often you update your site. However, you will certainly want to backup your site after any major changes to ensure all your hard work is not lost.

What we love most about All-in-One Migration is that it not only creates a backup of your site, but it is also a great tool for migrating your site to a new host or from a local server to a web host.

The following are the key feature of All-in-One WP Migration:

  1. WordPress Migration Made Simple – All-in-One WP Migration enables you to migrate your entire website in a matter of minutes and with just a few clicks. Everything is handled by the plugin, including the database, media files, themes, plugins, and settings.
  2. Unlimited Site Size – You can migrate sites of any size without restrictions, making even the largest websites easy to transfer.
  3. WP Compatibility – It works with the majority of WordPress hosting providers and servers, making it a versatile solution for website owners.
  4. Multisite Migration – The plugin allows you to migrate WordPress Multisite networks, including all subsites, users, themes, and plugins.
  5. WordPress Custom Domain Support – During the migration process, you can update your website’s domain name, ensuring that your site’s links and URLs are updated accordingly.
  6. Backup and Restore – The plugin includes a backup and restore feature that allows you to save a copy of your website before migrating and restore it if something goes wrong during the migration process.
  7. WP Cloud Storage Support – Supports cloud storage services such as Dropbox, Google Drive, and Amazon S3, making it simple to backup and transfer website files.
  8. Compatibility – Compatible with popular WordPress plugins such as Yoast SEO, Gravity Forms, and Contact Form 7, ensuring that the functionality of your website is not affected during the migration process.
  9. Updates Links and URLs – Automatically update all links and URLs in your website’s content to match the new domain name or server.
  10. Does Not Require Technical Expertise – All-in-One WP Migration is intended for non-technical users and does not necessitate any coding or technical skills in order to transfer your website.

Please Note: Some of the features listed may require purchasing a license. However, the free version is quite capable. To ensure this WordPress plugin is right for you, you can download it or view complete details here: All-in-One WP Migration

Top 5 WordPress Backup Plugins

When one embarks on the journey of running a WordPress site, the importance of backup plugins becomes abundantly clear. These are the life-saving tools that ensure the longevity of your digital masterpiece. They’re the superheroes of your WordPress world, swooping in to save the day when things go haywire.

  1. UpdraftPlus: Among the giants of WordPress backup plugins, UpdraftPlus holds a special place. Its intuitive interface, coupled with advanced features like incremental backups, makes it the knight in shining armor for many WordPress site owners. It offers a free version, but to experience its full capabilities, we recommend taking the premium route. Its support for multiple cloud storage options and easy restore function makes it a must-have for every WordPress site.
  2. VaultPress (Jetpack Backup): If ever there was a Superman among WordPress backup plugins, it would be VaultPress. Now known as Jetpack Backup, this plugin offers automated daily backups with unlimited storage space. What sets it apart is its real-time synchronization feature, ensuring that every change, every tiny tweak, is safely preserved. With its one-click restore functionality, it’s no less than a magical elixir for WordPress site owners.
  3. BackupBuddy: For those who believe in the power of customization, BackupBuddy could be their WordPress guardian angel. It stands out with its personalized backup content feature, giving you control over what to include or exclude in your backups. Add to this its reliable support team, and you’ve got a trusty aide ready to assist you in your hour of need.
  4. BoldGrid Backup: BoldGrid Backup, a brainchild of BoldGrid, is a versatile and dependable player in the backup plugin arena. Its auto-rollback feature can reverse an update gone wrong, bringing back the status quo, and saving your site from potential mayhem. What’s more, it allows easy migration of your site, making it a reliable buddy for those often daunting host-transitions.
  5. Duplicator: Last but definitely not least, Duplicator offers its unique set of backup and migration features. It stands tall with its ability to clone and migrate websites, even without any downtime. Perfect for developers who regularly build and test sites, or for those embarking on a host migration, Duplicator assures seamless transfers and backups to keep your WordPress journey smooth sailing.

Read our article How to Create Reliable WordPress Backups to learn more about backing up a WordPress website and why it’s so important.

#4 WordPress Functionality Plugins

This topic is very broad and will be different for every WordPress website. However, we have created a list of some of our favorite plugins that added functionality to the front and backend of some of the website we have created.

One Essential Plugin

Yoast SEO

Yoast SEO Plugin for WordPress is a popular tool that helps users optimize their websites for search engines. It handles your meta-tags, including the Title and description tags. These tags are essential for SEO, especially the Title tag. Yoast SEO has a lot of indispensable tools that analyze the SEO of each page and post, which helps you optimize your website without over-optimizing, which can incur the wrath of search engines like Google and Bing.

Here is a list of some key features it offers:

  • Focus Keyphrase Analysis: Yoast SEO helps you identify and target the right keywords for your content by providing suggestions and recommendations based on the focus keyphrase you enter.
  • SEO Analysis: The plugin provides real-time content analysis, offering suggestions on how to improve your content’s readability, keyword usage, and overall SEO performance.
  • Readability Analysis: Yoast SEO evaluates the readability of your content using the Flesch Reading Ease score and provides suggestions for improving it, such as sentence length, paragraph structure, and use of subheadings.
  • Breadcrumb Navigation: The plugin enables you to create and customize breadcrumb navigation for your website, which helps users and search engines better understand your site’s structure.
  • XML Sitemaps: Yoast SEO automatically generates an XML sitemap for your website, ensuring search engines can easily index your content.
  • Schema Markup: The plugin adds structured data to your website, improving the way search engines understand and display your content in search results.
  • Canonical URLs: Yoast SEO helps you prevent duplicate content issues by automatically adding canonical URLs to your pages and posts.
  • Title and Meta Description Templates: The plugin allows you to create customizable templates for your title and meta description tags, ensuring consistency and optimal character length.
  • Social Media Integration: Yoast SEO enables you to control how your content appears when shared on social media platforms like Facebook and Twitter by customizing Open Graph and Twitter Card metadata.
  • Internal Linking Suggestions: The plugin helps you improve your site’s structure by providing suggestions for internal linking opportunities based on your content.
  • Redirect Manager: Yoast SEO includes a built-in redirect manager that helps you easily create and manage redirects, ensuring a smooth user experience and minimizing the impact of broken links on your site’s SEO.
  • Import and Export: The plugin allows you to import and export your Yoast SEO settings, making it easy to apply your preferred configuration across multiple websites or migrate to a new WordPress installation.
  • Multilingual Support: Yoast SEO is compatible with popular multilingual plugins, ensuring your multilingual website is optimized for search engines.
  • Integration with Google Search Console: The plugin connects your website with Google Search Console, allowing you to view important crawl errors and indexing issues directly from your WordPress dashboard.
  • Content Insights: Yoast SEO provides insights into your content’s most frequent words and phrases, helping you understand your content and identify potential keyword opportunities.

15 More Essential WordPress Plugins

In the ever-evolving landscape of website creation, your toolkit can be the key to a seamless experience. Embark on a journey with us as we unveil the top 20 WordPress plugins that can transform your site into a digital powerhouse.

  1. Elementor: Breathe life into your vision with Elementor. This advanced drag-and-drop builder offers an extensive range of templates, making website customization a breeze. Unlock limitless creativity and design possibilities with this plugin.
  2. Contact Form 7: Stay connected with your audience using Contact Form 7. This plugin enables you to create and manage multiple contact forms, ensuring your audience can reach you whenever they need to.
  3. WooCommerce: Elevate your online store with WooCommerce. It’s a comprehensive e-commerce plugin that provides complete control to sell anything, anywhere. From payments and shipping to inventory management, it’s an e-commerce game-changer.
  4. Jetpack: Supercharge your WordPress site with Jetpack. This plugin offers an array of features from performance enhancements to automated social media posting, making it a one-stop solution for your website’s needs.
  5. Smush: Ensure crisp and fast-loading images with Smush. This plugin compresses and optimizes your images without compromising quality, boosting your website’s performance.
  6. Akismet: Keep the conversation clean with Akismet. This anti-spam plugin examines and filters out any potential spam comments, keeping your website’s discussion area pleasant and relevant.
  7. Broken Link Checker: Maintain your website’s credibility with Broken Link Checker. This plugin monitors and detects any broken links or missing images, ensuring a seamless user experience.
  8. Google XML Sitemaps: Streamline the way search engines understand your website with Google XML Sitemaps. This plugin generates a sitemap, helping search engines to index your site more efficiently.
  9. Gravity Forms: Create impressive forms with Gravity Forms. This plugin offers a plethora of form-building options and integrations, empowering you to build complex, powerful forms with ease.
  10. MonsterInsights: Get valuable insights with MonsterInsights. This Google Analytics plugin allows you to understand your audience better, enabling you to make data-driven decisions for your website.
  11. TablePress: Showcase your data effectively with TablePress. This plugin allows you to create and manage tables with ease, presenting your data in a visually appealing manner.
  12. MailChimp for WordPress: Grow your mailing list with MailChimp for WordPress. This plugin seamlessly integrates with your site, allowing you to gather and manage your subscribers efficiently.
  13. Redirection: Manage 301 redirects and monitor 404 errors with Redirection. This plugin ensures your site runs smoothly, preventing any potential issues caused by changed URLs.
  14. WPML: Go global with WPML. This multilingual plugin allows you to translate your website into multiple languages, reaching a broader audience.
  15. All in One SEO Pack: Boost your search engine visibility with the All in One SEO Pack. This powerful plugin offers a comprehensive suite of SEO tools, enabling you to optimize your website for maximum exposure.

In the vast ocean of WordPress plugins, the ones listed above are essential buoys guiding your journey. These power-packed tools simplify your tasks and offer an improved user experience, driving your website to the pinnacles of success.

Other Recommended Plugins

  • Better Search & Replace: This is an excellent tool that we use to search and replace text and URL’s within the WordPress database. For example, this tool can be used to replace all instances of a HEX color code when redesigning your site.
  • Caldera Forms Purchased by Ninja Forms: This is our favorite form builder. It has tons of useful features and allows you to build both simple and complex forms easily.
  • Newsletter: Add a newsletter to your website using this WordPress plugin. This is a great way to stay in touch with visitors to your site.
  • Font Awesome 4 Menus: This plugin allows you to add font icons to your menu, just like you see here on our site. The great thing about this plugin is once it is installed you will have the ability to add the icons anywhere on your site using the code found at http://fontawesome.io/icons/
  • My Privacy Policy and Terms Generator: A plugin that does exactly what its name says, it allows you to easily add a privacy policy and terms of services page to your site. Every website should include both of these pages. The “My Privacy Policy and Terms Generator” Plugin for WordPress is offered by My Island Designs, the site owner. Visit the WordPress Website Design Plugins for Web Designers page to view this and other plugins we offer, which are available only on this website.
Marketing Chart
W3 Total Cache WordPress Performance Plugin

Final Thoughts on Essential Plugins for WordPress Websites

A fast and secure site is crucial if you want to be found on major search engines like Google and Bing, and the essential WordPress plugins listed in this article can help. It is also vital to any marketing campaign since visitors are unlikely to wait for a slow site to load, and first impressions are just as important online as offline. Creating great content wastes your time if your visitors never see it, so follow the links below to test your site.

Summary

  1. Only Download Plugins from WordPress.org.
  2. Secure Your Site With a Reputable Plugin.
  3. Install Performance Plugins to Improve Page Speed.
  4. Test Your Site Using Google PageSpeedPingdom Tools.

Disclosure: You may find affiliate links to beneficial resources within this article. You won’t pay more for using our link, but we’ll get a commission. This supports our content creation, and we only suggest products we genuinely believe in. Thank you for being so understanding!

Affiliate Links

James Turner

James Turner

Author/Copywriter

Are you looking for a tech blogger and sales copywriter who can turn your message into a powerful tool for persuasion? Look no further than James Turner, a seasoned professional with over 25 years of experience in the tech industry. With a deep understanding of how to craft words that connect with readers and drive results, James is a master of the art of persuasive writing.

Why Choosing the Best Web Hosting Company Matters in 2025

Find out why choosing the best web hosting company matters in 2025 to boost your site’s performance and skyrocket sales.

Hiring a Website Designer

Hiring a website designer? Discover actionable tips, red flags to avoid, and how to find the right designer to create a website that grows your business.

How to Create a Landing Page Using WordPress

Follow our guide on how to create a landing page using WordPress and the built-in Block Editor, page builder plugins, or specialized themes.

Migrate a Local WordPress Installation to a Web Host

Migrate a Local WordPress Installation to a Web Host

Learn How to Migrate a Local WordPress Installation to a Web Host

To help you learn how to migrate a local WordPress installation to a web host, I will introduce you to some WordPress plugins, including Duplicator, WPvivid, and All-in-One Migration. When one desires to transfer a locally installed WordPress site to a web host, the process may appear intricate. However, with the appropriate expertise, this task can be simplified, and each of the tools involved can prove to be invaluable.

We need to understand what a local WordPress installation is to initiate this process. A local WordPress installation is, in essence, a locally hosted website on your personal computer. This approach allows you to make and experiment with your website’s changes without affecting your live website, which is often hosted on a web host. By using local installations, you can save a considerable amount of time and avoid unnecessary potential mishaps.

Choose a WordPress Migration Plugin

This step is very easy, you only need to choose one of the WordPress migration plugins listed below. Read the description for each plugin below to decide which one best suits your needs and skill level. We absolutely love both of these plugins, but neither of them works flawlessly in every situation, so if one does not work for you we recommend trying the other. You may also want to check out Essential WordPress Plugins for Every Website for a list of WordPress plugins we use on almost every site we create for our clients.

Duplicator WordPress Plugin


Duplicator:

This is an excellent plugin for migrating websites and is very easy to use. However, you will need to upload the files to your host using the file manager in their control or an FTP program like FileZilla (32bit), FileZilla (64bit), or FileZilla for Mac OS X. After uploading the files, you visit the page http://www.YourDomainURL.com/install.php, and Duplicator will walk you through the process of migrating your site in less than five minutes.


All-in-One Migration Plugin

All-in-One Migration:

You must install WordPress on your web host to use the All-in-One Migration plugin. However, you can use this plugin to upload the files, so you will not need to use an FTP program to upload the files. Most web hosts have a utility that will install WordPress for you, which makes the process very easy. Log in to your WordPress site, install the All-in-One Migration plugin, and use the plugin to upload your files and migrate your site.


WPvivid Backup and Migration Plugin

WPvivid Backup Plugin:

The WPvivid All-in-One Backup & Migration Plugin for WordPress is a reliable, versatile tool offering backup and migration features. It allows scheduled and selective backups compatible with cloud services like Google Drive, Dropbox, and Amazon S3, alongside one-click migration for effortless transfer of your WordPress site between hosts.


WordPress Migration
WordPress Migration Plugins

“Developing your WordPress site locally and migrating the finished site to a web host will save you time and money. Local website development also ensures your site looks and functions perfectly before it goes live.”

Watch Our YouTube Video “How Do I Migrate My WordPress Website to a New Web Host?”

Install All-in-One Migration

In your WordPress dashboard look in the menu on the left side of the page. Hover over “Plugins” and select Add New. In the search box type All-in-One Migration. Click the install button and wait for it to finish installing, then click the “Activate” button. Now you will see a link to the plugin in the menu on the left side of your dashboard.

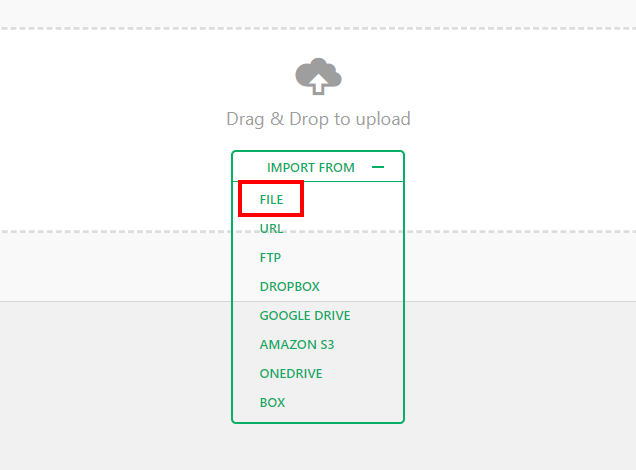
Click All-in-One Migration, then Export and then follow the instructions below.

Export to file as shown in the image below.

All-in-One Migration Export to File

The plugin will create a file containing your entire site, including the database. After it starts you need to stay on the page and wait for it to finish.

All-in-One Migration Creates a File

Download the file when it is finished (see image below).

Download the All-in-One Migration File

Now log in to to the WordPress site you created on your web host and import the file you just downloaded, using the All-in-One Migration plugin.

Import the All-in-One Migration File
Congratulations!

You just migrated your local site to a web host using the WordPress All-in-One Migration plugin. Your password and user name will be the same as they were for your local site. Please make sure your password is strong to avoid being hacked.

Install The Duplicator Plugin

The makers of the Duplicator plugin have created a very good and detailed quick start guide that walks you through the entire process and explains everything very well, so we recommend visiting their site to learn how to use this plugin.

Duplicator Quick Start Guide

The Best WordPress Migration Plugins
Learning How to Use WordPress Just Got Easier

How to Successfully Migrate Your Website using the WPvivid Backup Plugin

Website migration can be a complex task, but it can be simplified with the right approach and tools. This article will guide you through migrating your website using the WPvivid Backup Plugin. This plugin offers a user-friendly solution that ensures a smooth transfer without data loss or downtime.

Download the WPvivid Migration, Backup, and Staging Plugin for WordPress.

Understanding the WPvivid Backup Plugin

The WPvivid Backup Plugin is specifically designed for WordPress websites and provides a range of features to facilitate website migration. It allows you to create comprehensive website backups, including files, databases, plugins, themes, and settings. The plugin is compatible with various hosting environments and offers an intuitive interface for easy navigation and configuration.

Preparing for Migration

Before initiating the migration process, it is crucial to make the necessary preparations. Start by creating a backup of your website using the WPvivid Backup Plugin. Verify the backup files to ensure their integrity and completeness. Additionally, ensure that the new hosting environment meets the requirements of your website.

Installing and Configuring the WPvivid Backup Plugin

Begin by installing the WPvivid Backup Plugin from the WordPress Plugin Directory. Once installed, configure the plugin settings according to your preferences. Customize backup options, such as frequency and storage locations, to suit your needs.

Backing Up Your Website

With the WPvivid Backup Plugin set up, you can create a website backup. Access the plugin dashboard in your WordPress admin panel and navigate to the backup section. Choose whether to perform a full backup or select specific files and databases for backup. WPvivid offers flexibility in storing backups locally or utilizing cloud storage services.

Migrating Your Website

You need to set up a new hosting environment to migrate your website. Once ready, upload the backup files to the new environment. Configure the database settings to establish proper connectivity. WPvivid provides a seamless file transfer functionality and offers options for automatic database updates during migration.

Restoring Your Website

Initiate the restoration process using the WPvivid Backup Plugin. Follow the step-by-step wizard to unpack the backup files, restore databases, and recreate necessary files and folders. Verify the restored website for proper functioning, and address any common migration issues with the help of WPvivid’s support resources.

Best Practices for Successful Migration

To ensure a successful website migration, follow these best practices:

  • Thoroughly test the migrated website to ensure all pages, links, and functionalities work correctly.
  • Update DNS settings to redirect your domain name to the new hosting environment.
  • Monitor website performance after migration, checking loading times and server response.

Conclusion

Migrating a website is a critical process, and the WPvivid Backup Plugin offers a reliable solution to simplify the task. Following the steps outlined in this article and adhering to best practices, you can successfully migrate your website using WPvivid. Enjoy a seamless transition to your new hosting environment with minimal disruption.


FAQs

1. Can I use the WPvivid Backup Plugin for non-WordPress websites?

No, the WPvivid Backup Plugin is exclusively designed for WordPress websites and may not be compatible with other platforms.

2. Is the WPvivid Backup Plugin free?

The WPvivid Backup Plugin offers both free and premium versions. The free version provides basic backup and migration functionalities, while the premium version includes advanced features and additional support options.

3. How long does it take to migrate a website using the WPvivid Backup Plugin?

The time required for website migration varies depending on factors such as website size, server speed, and complexity of the migration process. However, the WPvivid Backup Plugin streamlines the process to minimize

the time needed for migration, ensuring efficiency and a smooth transition.

4. Can I schedule automatic backups with the WPvivid Backup Plugin?

Yes, the WPvivid Backup Plugin allows you to schedule automatic backups according to your preferred frequency. You can set up daily, weekly, or monthly backups to ensure regular data protection.

5. What should I do if I encounter any issues during the migration process?

If you experience difficulties or have questions during the migration process, the WPvivid Backup Plugin provides comprehensive documentation and support resources. You can refer to the plugin’s documentation for troubleshooting guidance or contact their support team for further assistance.

To learn more about the WPvivid Backup Plugin and its benefits, visit their website to learn more about the All-in-One Backup & Migration Plugin for WordPress.

Armed with the knowledge and steps outlined in this article, you can confidently migrate your website using the WPvivid Backup Plugin. Enjoy a seamless transition to your new hosting environment while ensuring the safety and integrity of your valuable website data.

Final Thoughts

There are a lot of possible settings and uses for both for these plugins but you will find they are very easy to use after going through the tutorials. Both of these plugins are also great for backing up your site, though we prefer UpdraftPlus for backups since you can have your backups emailed to you or sent to your cloud storage account. You can send backups to Google Drive using the free version, but the paid version adds many more cloud storage options like Dropbox.

Summary

  1. Devlop WordPress Sites Locally
  2. WordPress Migration is Easy
  3. All-in-One Migration
  4. WordPress Duplicator Plugin

Update: 01/07/2018

In this article, we discussed the importance of backing up your WordPress site using multiple methods before migrating, and we want to stress again the importance of doing so in this update.

Recently we moved several of our clients to a new host using our go-to method, backing up the files and database and uploading them to the new host. Restoring your site using this method is a simple and straightforward method that works perfectly in the majority of cases. However, one of the websites did not work correctly after migration.

The home page and many of the other pages worked fine, but upon further inspection, some pages were generating a 500 Internal Server Error. It would have been possible to debug the issue, but it requires developer-level knowledge most users do not possess, and even with that knowledge we may have needed several hours to correct the problems.

How We Resolved the Issues

Resolving the issues was quite simple, we just installed a fresh copy of WordPress and the All-in-One Migration plugin we recommend in this article, uploaded the backup we created, and the site was back up in minutes.

This case is a prime example of the need to use multiple methods of backing up your site before migration, and even as part of your regular backup plan. Because if you have any problems migrating your site or restoring it after an update or getting hacked, most likely you can save yourself hours of work or a lot of money, which you would have paid a developer to debug your site and restore it.

Disclosure: You may find affiliate links to beneficial resources within this article. You won’t pay more for using our link, but we’ll get a commission. This supports our content creation, and we only suggest products we genuinely believe in. Thank you for being so understanding!

Affiliate Links

James Turner

James Turner

Author/Copywriter

Are you looking for a tech blogger and sales copywriter who can turn your message into a powerful tool for persuasion? Look no further than James Turner, a seasoned professional with over 25 years of experience in the tech industry. With a deep understanding of how to craft words that connect with readers and drive results, James is a master of the art of persuasive writing.

Why Choosing the Best Web Hosting Company Matters in 2025

Find out why choosing the best web hosting company matters in 2025 to boost your site’s performance and skyrocket sales.

Hiring a Website Designer

Hiring a website designer? Discover actionable tips, red flags to avoid, and how to find the right designer to create a website that grows your business.

How to Create a Landing Page Using WordPress

Follow our guide on how to create a landing page using WordPress and the built-in Block Editor, page builder plugins, or specialized themes.

How to Install WordPress Locally on Windows or Mac

How to Install WordPress Locally on Windows or Mac

Create a Server on a Windows or Mac Computer and Install WordPress Locally

If you’re looking to enhance your understanding of WordPress or expedite the process of website development and testing, learning how to create a server on Windows and install WordPress locally on either a Windows or Mac computer is highly advantageous.

By opting for a local installation, you create an environment that facilitates a smoother learning curve and empowers you to assess the compatibility and stability of various plugins or themes before implementing them on your live website. By streamlining your workflow, you reduce the likelihood of problems that could negatively affect the functionality of your live website.

You may also be interested in these helpful XAMPP FAQs.

Step 1: Download and Install XAMPP

This step is very easy, you only need to choose one of the download links below based on the type of computer you use. Save the file to your desktop or somewhere it will be easy to find.

Download XAMPP Portable for Windows

or

Download XAMPP for MAC


Windows 10 Installation
We Prefer XAMPP Portable on Windows 10 Computers
Using XAMPP as a Local Server
XAMPP contains the Apache server, MySQL, Filezilla FTP server, Tomcat, and Mercury. However, we will only be focusing on using the Apache server and MySQL to run WordPress on your computer. You are welcome to search for information on using the other components if you would like to learn how to run your own web server. However, running a web server is very complex due to security and performance issues, so we recommend leaving that to a reputable web host.

To Run WordPress Locally You Will Need to Install

  • Apache Web Server
  • MySQL Database Server
  • PHP
  • phpMyAdmin
“One of the things you will love most about a local WordPress installation is how fast it is. Another great benefit is the ability to create as many local sites as you want.”

Step 2: Install XAMPP

Now that you have downloaded XAMPP you need to install it.

Window Computers: Click the file you downloaded to copy the portable version of XAMPP to your C: drive, which is normally the drive where Windows is installed.

XAMPP Portable for Windows

Next you will need to select the services you wish to install. You will need a minimum of Apache, MySQL, PHP and phpMyAdmin. You can uncheck FileZilla, Mercury, Tomcat, Webalizer and Fake Sendmail to save a little space or leave them all checked, which is the default setting.


XAMPP Services for Windows

Macintosh: (no screenshots) This is just as easy, just unzip the file you downloaded and drag that folder into your Applications folder.

WordPress
Learning How to Use WordPress Just Got Easier

Step 3: Testing Your XAMPP Installation

Your local server should be installed and ready to go, but before we install WordPress let’s test your XAMPP installation to make sure everything works properly.

Starting XAMPP (Windows)
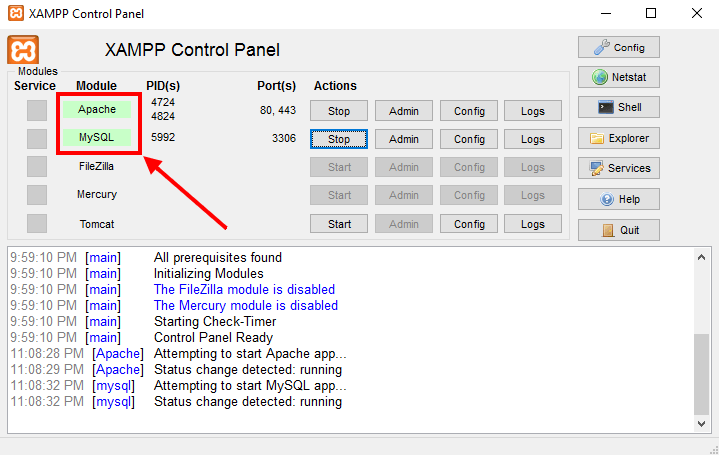
Navigate to the folder where you installed XAMPP (C:/xampp/) and click on the “xampp-control” icon, which will start the control panel. Now click the Start button next to Apache and MySQL. If it is working properly the names of the services will be highlighted in green. Red or yellow indicates a problem with your installation.

XAMPP Control Panel

Starting XAMPP (Mac)

To start XAMPP simply open XAMPP Control (by going to /Applications/XAMPP/XAMPP Control in Finder) and start Apache and MySQL. If the MySQL server does not start, you may need to set the permissions to 777 using Terminal.

The command is “chmod -R 777 /Applications/XAMPP/xampfiles/var” without the quotes.

Installing XAMPP on Windows – The Text Version (Step by Step)

Step 1: Begin by visiting the official website of Apache Friends. Navigate to the section where you can download the XAMPP software package.

Step 2: Select and acquire the latest version of XAMPP tailored for Windows, ensuring compatibility with your specific operating system.

Step 3: Once the download completes, locate the downloaded file and perform a double-click to initiate the installation process.

Step 4: The XAMPP installer will manifest on your screen. Advance the installation by clicking the “Next” button.

Step 5: A selection of components available for installation will be presented. Unless you have specific requirements, it is generally recommended to keep all components checked. Proceed by selecting “Next.”

Step 6: Determine the desired installation directory for XAMPP. The default location is typically “C:\xampp,” but feel free to customize it as needed. Click “Next” to proceed.

Step 7: During the installation, you might encounter a prompt about installing Bitnami for XAMPP. If you wish to install any of the offered applications, simply select them. Otherwise, uncheck the boxes and click “Next.”

Step 8: After one more click on “Next,” the installation process will commence. Be patient as this step may take a few minutes to complete.

Step 9: Once the installation concludes, a confirmation message will appear. Ensure that the option to start the XAMPP Control Panel is selected, and then click “Finish.”

Step 10: Now, the XAMPP Control Panel will open before you. Through this panel, you can effectively manage the Apache web server, MySQL database, and other components bundled within the XAMPP package.

Step 11: To verify the successful installation of XAMPP, launch your web browser and enter “http://localhost” into the address bar. If you encounter the XAMPP welcome page, it signifies the completion of the installation process.

Congratulations! You have successfully configured XAMPP on your Windows 10 machine. You are now ready to embark on various web development and testing endeavors using this versatile tool.

Step 4: Installing WordPress on Your Local Server

Now that your local server is up and running, you are ready to install WordPress. This is actually quite easy to do, but there are quite a few steps involved, so follow the instructions below carefully and you will have WordPress up and running in minutes

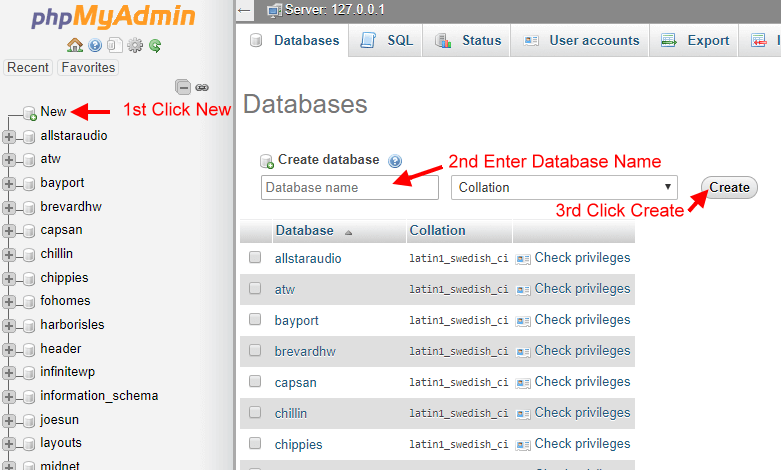
Open phpMyAdmin by Clicking the Admin Button
Open phpMyAdmin
Create a Database Named “wordpress” Using phpMyAdmin
Create a Database With phpMyAdmin

Download The Latest Version of WordPress – Click Here

Download WordPress

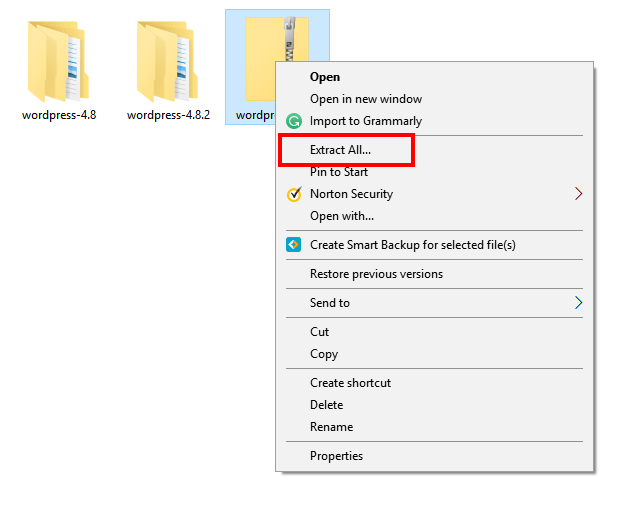
Right Click the Zip File You Download and Click “Extract All”

Unzip WordPress Folder

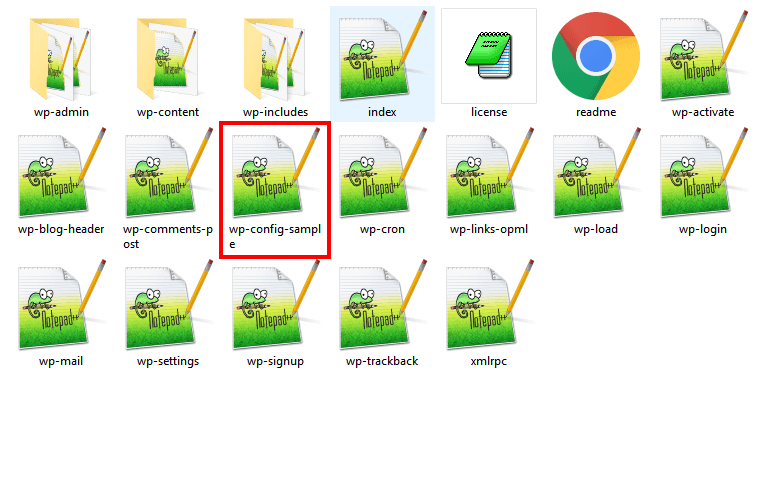
Open the Folder and Rename wp-config-sample to wp-config

Rename wp-config-sample
Edit wp-config With a Text Editor Like Notepad or Notepad++

The database name is the same as you created, which is “wordpress” without quotes. The username is the server default “root” without quotes and the password should be blank, so you will need to delete “password_here” but NOT the single quotes. Click on the link https://api.wordpress.org/secret-key/1.1/salt/ in your text editor or copy and paste it into your browsers address bar and replace the lines of code below. Be sure that you ONLY REPLACE THE CODE HIGHLIGHTED IN THE IMAGE BELOW.

Your Edited wp-config Should Look Like The Image Below

Edited wp-config

Please note the “Unique Keys and Salts” will be different than pictured, which is the normal and desired result, since these are unique security keys, which should be different for every WordPress website you create.

CONGRATULATIONS! The Hard Part is Over.

Now Let’s Finish Installing WordPress

The last step is to copy your wordpress folder to C:\xampp\htdocs and type or copy and paste http://localhost/wordpress/ into your browsers address bar. Select your language, and follow the prompts. Even though this is a local install you should use a strong password since the username password will remain the same should you decide to transfer your WordPress website to a web host in the future.

WordPress
WordPress Design
WordPress Code
WordPress Security

Frequently Asked Questions About XAMPP

What is XAMPP?
XAMPP is a free and open-source software package that includes Apache web server, MySQL database, PHP programming language, and Perl interpreter. It is designed to make it easy to set up a local web server environment for web development and testing purposes.

How do I install XAMPP?
To install XAMPP, you can download the package from the official website and run the installation program. The installation process is straightforward, and you can choose which components to install.

What operating systems does XAMPP support?
XAMPP is compatible with Windows, Linux, and macOS operating systems.

What is the purpose of XAMPP control panel?
The XAMPP control panel allows you to start and stop Apache, MySQL, and other components of XAMPP. It also provides access to the configuration files and logs of these components.

How do I start and stop Apache and MySQL using XAMPP control panel?
To start Apache and MySQL, you can simply click the “Start” button next to each component in the XAMPP control panel. To stop them, click the “Stop” button.

How do I access phpMyAdmin using XAMPP?
To access phpMyAdmin, open your web browser and type “localhost/phpmyadmin” in the address bar. This will take you to the phpMyAdmin login page where you can enter your username and password.

How do I configure Apache and PHP settings in XAMPP?
You can edit the “HTTPD .conf” file in the “apache” folder of XAMPP to configure Apache settings. To configure PHP settings, edit the “PHP .ini” file in the “PHP” folder of XAMPP.

How do I create a new database in MySQL using XAMPP?
To create a new database in MySQL, access phpMyAdmin and click on the “Databases” tab. Enter a name for your new database and click the “Create” button.

Can I use XAMPP for production websites?
While XAMPP is primarily designed for local development and testing, it is possible to use it for small-scale production websites. However, it is not recommended for high-traffic or mission-critical websites.

How do I uninstall XAMPP?
To uninstall XAMPP, you can simply delete the XAMPP folder from your computer. However, this will also delete any data stored in MySQL databases. If you want to keep your data, you should back up your databases before uninstalling XAMPP.

How Do I Update XAMPP?

To update XAMPP, you can follow these steps:

  1. First, backup all your data and files in the XAMPP directory before updating.
  2. Download the latest version of XAMPP from the official Apache Friends website.
  3. Run the downloaded installer and choose the directory where you installed XAMPP.
  4. During installation, you may be prompted to choose which components you want to install or update. Select the components you want to update or install and click the “Next” button.
  5. Follow the prompts to complete the installation process. The installer may ask you to stop the XAMPP services, so ensure that before proceeding.
  6. Once the installation is complete, you can start the XAMPP services and test to ensure everything works correctly.

Note: It is recommended to update XAMPP regularly to keep it up-to-date with the latest security and bug fixes.

Watch Our YouTube Video

Final Thoughts On Installing WordPress

Congratulations on installing XAMPP and WordPress Locally on your computer. Whether you are an experienced developer or new to WordPress, you are going to love being able to do almost anything you can do on a hosted site, at blazing fast speeds. If you want to install on a web host, check out our article on How to Install WordPress in Minutes for detailed instructions.

Summary

  1. Install XAMPP on Windows, Mac, or Linux
  2. Local WordPress Installations are FAST
  3. Install Multiple Instances
  4. Fantastic for Beginners
  5. Essential for Developers

Note: Your computer’s resources are the only limit to the number of WordPress installations possible. However, since you will typically only run one or two sites simultaneously, it is unlikely you will ever run into any issues. At My Island Designs, we have created over one hundred local sites on a single computer without any problems.

Disclosure: You may find affiliate links to beneficial resources within this article. You won’t pay more for using our link, but we’ll get a commission. This supports our content creation, and we only suggest products we genuinely believe in. Thank you for being so understanding!

Affiliate Links

James Turner

James Turner

Author/Copywriter

Are you looking for a tech blogger and sales copywriter who can turn your message into a powerful tool for persuasion? Look no further than James Turner, a seasoned professional with over 25 years of experience in the tech industry. With a deep understanding of how to craft words that connect with readers and drive results, James is a master of the art of persuasive writing.

Why Choosing the Best Web Hosting Company Matters in 2025

Find out why choosing the best web hosting company matters in 2025 to boost your site’s performance and skyrocket sales.

Hiring a Website Designer

Hiring a website designer? Discover actionable tips, red flags to avoid, and how to find the right designer to create a website that grows your business.

How to Create a Landing Page Using WordPress

Follow our guide on how to create a landing page using WordPress and the built-in Block Editor, page builder plugins, or specialized themes.

How to Get Better Rankings

How to Get Better Rankings

Take Your Rankings to The Top With Search Engine Optimization, Better Local SEO

To get better rankings in major search engines like Google and Bing, you must create a great site containing content your visitors will find helpful. Of course, It’s a little more complicated than that, but we’re here to walk you through the process, so let’s get started!

Watch Our YouTube Video “Learn WordPress SEO in 5 Minutes: Okay, 7 Minutes” and Get Better Rankings

Step 1: Determine Your Goal

This step should be pretty straightforward but also essential; you need a clear goal to achieve the desired results and get better rankings for your website. Although a website can accomplish more than one goal, it is easier to focus on one.

Get Better Rankings with Search Engine Optimization
Local SEO – Search Engine Optimization

What is Your Goal?
To create a successful site, you need to have a goal and plan precisely how you will reach that goal. If you want your website to rank well, your plan needs to be focused, so don’t try to be all things to all people. The best course of action is almost always focusing on a niche, then explaining to your target audience why you are the best for widgets in town.

KNOW YOUR…

  • Self
  • Competition
  • Audience
  • Limits
“Google is pushing for ALL sites to be secure. Your URL should begin with “https” instead of “http” which means the site is secured using an SSL Certificate.”
Use SEO to Get Better Rankings and More Traffic

Use SEO to Get Better Rankings and More Traffic

Step 2: Creating Your Website

Now that you have set a goal to get better rankings, and more traffic, create a plan, and understand the target audience, it’s time to create a fantastic website. Every aspect of your website design should be focused on accomplishing your goal, which means you need to get your visitors to do something. What that something is will vary depending on your goals, but make sure your website is like a funnel with all points leading to your something.

  • Sell Products
  • Promote Services
  • Branding
  • Generate Leads
  • Customer Service
  • SOMETHING!
Social Media Footprint
Create a Social Media Footprint

Step 3: Creating a Digital Footprint

Although there are many factors involved in the ranking process, one of the most important factors is reputation. How does Google know you can be trusted? How do the search engines know whether or not you are reliable? One of the fastest, easiest and best ways to establish your reputation is to create a digital footprint.

How Do I Create a Digital Footprint?

Creating a digital footprint is pretty easy, and it is something that MUST be done to protect your brand and to grow your business online. As soon as your site is live you need to start registering accounts on all the top social networks and other authority sites. This will help you begin the process of creating a digital footprint.

You can start by getting listed on the sites below if applicable, but this is only the beginning and you should spend time researching sites that are specific to your industry and get listed on or interact with any sites that could benefit your business.

Suggested Accounts

  • Google My Business
  • Twitter
  • Facebook
  • Yelp
  • YP.com
  • LinkedIn
  • Tumblr
  • YouTube

There are, of course, many more sites out there, but this is a good start. Remember, be consistent and create pages using your exact name if at all possible. If you have not registered your business yet, you may want to consider creating a unique name to ensure you can secure facebook.com/yourname and twitter.com/yourname instead of a variation of your name, which could be confusing and make branding more difficult.

Facebook
Google +
Twitter
Social Media

Step 4: Making Time Makes a Difference

We all want to get better rankings, but few of us, including myself, set aside time to accomplish our goals. Unfortunately, improving your rankings will require hard work on your part. However, the good news is that few of your competitors will set aside time each day to improve their search engine rankings, which means you can rank very well for your chosen keywords if you put forth the effort.

Create a Marketing Plan That Works for You

Being a website designer with 20 years of experience, you may be shocked that I have never dedicated time to marketing my business. As a professional, I have spent a great deal of time marketing my business, but I have only recently set aside time dedicated solely to that purpose.

My Plan is Simple, and it Works for Me

You need to create a plan that works for you because that is the only way you will stick to it. My plan is simple; I get to work an hour earlier each day and devote that hour to creating new content for my site, updating existing content, social media management, and other related tasks. In the future, I may consider devoting specific days to content, social media, and other marketing efforts because it may be more efficient.

Suggested Marketing Efforts

How and when you do these things are not as important as doing them. However, I believe it helps to set aside time each day to promote your business. Increasing your search engine rankings, promoting your brand on social media sites, and networking with other businesses in your area are all fantastic ways to grow your business online and offline.

Creating a Local SEO Strategy for Your Business

Creating a Local SEO Strategy for Your Business

Step 5: Creating an Effective SEO Strategy for Local Businesses

A local business must have a strong internet presence to get better rankings and reach potential clients in your neighborhood. Your company can stand out in search engine results and draw the proper clients to your website with an effective optimization (SEO) plan. Here are some guidelines for developing a successful SEO plan for your neighborhood business.

1. Conduct keyword research

Understanding the internet search terms used by your target clients is essential before you begin optimizing your website. You can use this to decide what to concentrate on in your SEO strategy. You can use free tools like Google Keyword Planner to find keywords relevant to your company and sector.

2. Optimize your Google My Business listing

Google My Business is a free tool allowing businesses to manage their online presence across Google, including search results. Ensure your Google My Business listing is up-to-date and accurate, including your name, address, phone number, and operating hours. You should also add photos and encourage customers to leave reviews, as positive thoughts can positively impact your ranking in search results.

3. Use local keywords and structured data

Incorporating local keywords into your website and content can help search engines understand the location of your business and improve your visibility in local search results. You should also include structured data, such as Schema.org markup, to give search engines more information about your business and services.

4. Build quality backlinks

Backlinks from other reputable websites can help improve your website’s authority and ranking in search results. Focus on building relationships with local businesses and organizations, and consider creating valuable content, like blog posts or infographics, that other websites may want to link to.

5. Monitor your progress and adjust as needed

SEO is ongoing; therefore, it’s important to keep an eye on the effectiveness of your website and make any necessary improvements. Track the visibility and traffic to your website and look for opportunities to enhance using tools like Google Search Console and Google Analytics.

Local SEO Tip: Optimize Your Google My Business Listing

An effective SEO strategy is crucial for local businesses looking to reach potential customers online. You can improve your website’s ranking and visibility by conducting keyword research, optimizing your Google My Business listing, using local keywords and structured data, building quality backlinks, and regularly monitoring your progress.

Sample Online Marketing Plan for Businesses

Sample Online Marketing Plan for Businesses

Bonus Step: Sample Online Marketing Plan

A well-structured plan and the appropriate tools can make it possible to reach and engage your target audience even if developing and implementing an internet marketing strategy can be a challenging process. To create and carry out an online marketing strategy, follow these steps:

  1. Identify your target market: Determine the age, gender, region, hobbies, and behavioral patterns of your target audience to start. You can use this information to choose the most effective methods and strategies for reaching them.
  2. Conduct market research: To comprehend the current market trends and customer needs, research your sector and your competitors. This will enable you to distinguish your brand from competitors and develop a distinctive value proposition.
  3. Set your goals: Define clear, measurable, and attainable goals for your internet marketing efforts. These could include increasing website traffic, generating leads, improving customer engagement, and boosting sales.
  4. Choose your channels: Choose the channels that will be most successful in reaching your target audience based on your study and comprehension of them. Search engines, social networking, email marketing, and online advertising are a few examples.
  5. Develop your content: Produce entertaining, pertinent, and high-quality content that appeals to your target demographic and advances your marketing objectives. This might apply to e-books, infographics, films, and blog entries.
  6. Launch and monitor your campaign: Execute your online marketing strategy, monitor your development, and assess the impact of your efforts. Make necessary adjustments by using analytics tools to track important metrics like website traffic, conversions, and engagement.
  7. Refine and adjust your strategy: Based on the outcomes of your efforts, continually assess and improve your internet marketing plan. To gradually enhance your performance, try out new strategies, compare various plans of action, and make data-driven choices.

Relevant Points:

  • Identify target audience demographics
  • Conduct market research
  • Set clear and measurable marketing goals
  • Choose effective marketing channels
  • Develop high-quality, relevant content
  • Launch and monitor your campaign
  • Use analytics to track results and adjust strategy
  • Continuously refine and adjust your marketing plan.
Search Engine Optimization Tips and Final Thoughts

Search Engine Optimization Tips and Final Thoughts

Unleashing the Power of SEO: The Ultimate Guide

Digital marketing’s key component of search engine optimization (SEO) may make or break your online presence. Your website’s organic traffic generation, exposure on search engine result pages (SERPs), and, eventually, your bottom line can all benefit from this. Understanding the ins and outs of SEO is crucial for success in the digital age; regardless of your level of marketing experience, there are things you can do right now to improve your rankings.

SEO Questions Answered

Best SEO Tips

A few best practices remain timeless in the often-complex and dynamic world of SEO. When optimizing your website for search engines, keep the following in mind:

  • Conduct keyword research to understand what your target audience is searching for and what terms they are using.
  • Ensure that your website is fast and responsive, and that it provides a good user experience.
  • Make sure your website is well-organized and easy to navigate.
  • Publish high-quality, relevant content that provides value to your target audience.
  • Build high-quality backlinks from reputable websites to demonstrate to search engines that your website is authoritative and trustworthy.

Top 3 SEO Strategies

In order to be effective, SEO demands a well-thought-out plan over the long run. The top three SEO tactics that you should be concentrating on are as follows:

  1. Technical SEO: This involves optimizing your website’s technical aspects, such as website speed, mobile responsiveness, and site structure, to ensure it’s easy for search engines to crawl and index your content.
  2. On-page SEO: This involves optimizing individual web pages for search engines, including optimizing your content for keywords, using descriptive title tags and meta descriptions, and using header tags to structure your content.
  3. Off-page SEO: This involves building high-quality backlinks from other reputable websites to increase your website’s visibility and authority in the eyes of search engines.

Golden Rule of SEO

The cornerstone of SEO is to design a website that works well for both users and search engines. This entails developing a quick, responsive, user-friendly website that offers high-quality, relevant material that your target audience is searching for. By prioritizing users, you’ll organically optimize your website for search engines, which will eventually improve search engine ranks and boost organic traffic.

Do and Don’ts of SEO

It’s critical to understand what to do and what not to do with SEO if you want to succeed. Some of the most significant SEO dos and don’ts are listed below:

Do’s of SEO

  • Do conduct keyword research to understand what your target audience is searching for.
  • Do publish high-quality, relevant content that provides value to your target audience.
  • Do build high-quality backlinks from reputable websites.
  • Do optimize your website’s technical aspects, such as website speed and mobile responsiveness.

Don’ts of SEO

  • Don’t engage in any black hat SEO tactics, such as keyword stuffing or link spamming, as these practices can get your website penalized or banned by search engines.
  • Don’t publish low-quality, irrelevant content just for the sake of having content on your website.
  • Don’t build low-quality backlinks from spammy websites, as these links can harm your website’s reputation and search engine rankings.
  • Don’t ignore the importance of user experience, as this can negatively impact your search engine rankings and drive users away from your website.

What Does an SEO Strategy Look Like?

A successful SEO plan should take the following actions and be customized to your company and target market:

  1. Keyword research to understand what your target audience is searching for.
  2. Analysis of your website’s current technical and on-page optimization to identify areas for improvement.
  3. Creation of high-quality, relevant content that provides value to your target audience and is optimized for keywords.
  4. Building high-quality backlinks from reputable websites to increase your website’s visibility and authority.
  5. Continuous monitoring and adjustment of your SEO strategy as search engines and your target audience’s search habits evolve over time.

What is an SEO Checklist?

A thorough list of tasks and best practices known as an SEO checklist will assist you make sure that your website is search engine optimized. Among the items in an SEO check list could be:

  1. Conducting keyword research and analyzing your target audience’s search behavior.
  2. Optimizing your website’s technical aspects, such as website speed, mobile responsiveness, and site structure.
  3. Ensuring that your website’s content is high-quality, relevant, and optimized for keywords.
  4. Building high-quality backlinks from reputable websites.
  5. Monitoring your website’s search engine rankings and traffic to measure the success of your SEO efforts.

What are the 7 Types of SEO?

There are seven main types of SEO, including:

  1. Technical SEO
  2. On-page SEO
  3. Off-page SEO
  4. Local SEO
  5. Content SEO
  6. E-commerce SEO
  7. Voice Search Optimization

Each type of SEO focuses on a different optimization aspect and has its unique set of best practices. To succeed with SEO, it’s important to comprehensively understand each type and how they work together to improve your website’s search engine rankings.

What is the Most Difficult Part of SEO?

The most challenging part of SEO is often staying up-to-date with the constantly evolving search engine algorithms and best practices. Search engines like Google are always updating their algorithms to provide users with the most relevant and high-quality results. This means that SEO strategies that were once effective may no longer be as impactful. Staying informed about the latest developments in SEO and continuously adjusting your strategy is essential for success in the long-term.

How Do I Rank High in SEO?

To rank high in SEO, you need to comprehensively understand how search engines work and what they look for in a website. This includes optimizing your website’s technical aspects, such as website speed and mobile responsiveness, as well as creating high-quality, relevant content that is optimized for keywords and provides value to your target audience. Additionally, building high-quality backlinks from reputable websites and continuously monitoring and adjusting your SEO strategy can help increase your website’s visibility and search engine rankings over time.

What negatively affects SEO?

Numerous variables can have a detrimental effect on the SEO of your website. The most frequent offenders are shown in the list below:

  • Keyword stuffing: Using the same term too frequently on your website will lower its ranking. Aim to incorporate keywords into your content naturally so as to improve user experience.
  • Duplicate content: Search engines prefer original content, so ensure your website has unique, high-quality content. Copying text from other websites or using spun content will not help your SEO.
  • Lack of mobile optimization: A mobile-friendly website is essential for SEO as more and more people access the internet using mobile devices. Make sure your website is user-friendly and responsive across all platforms.
  • Poor website design and navigation: The design and layout of your website should be user-friendly and easy to navigate. A confusing website can lead to a high bounce rate and negatively impact your SEO.
  • Neglecting technical SEO: Technical SEO includes things like optimizing your website’s structure and making sure that it is easy for search engines to crawl and index your pages. Neglecting technical SEO can harm your website’s ranking.

What is the best SEO tool?

Many different SEO tools are available, and the best one for you will depend on your specific needs and budget. Some popular SEO tools include:

  • Google Analytics: This free tool provides data and insights on your website’s traffic and performance. You can use this information to improve your website’s SEO and make more informed decisions about your content and marketing strategies.
  • Ahrefs: Ahrefs is a paid tool that analyzes your website’s backlinks and keyword ranking. It is an essential tool for conducting competitor research and staying on top of your SEO efforts.
  • SEMrush: SEMrush is a thorough SEO tool that offers information on your website’s rating, traffic, and backlinks, competitor analysis and keyword research. SEO experts frequently utilize this premium tool.

Why is SEO so difficult?

SEO can be difficult for a number of reasons. First of all, because search engines regularly modify their algorithms, what was formerly successful might no longer be. Second, SEO takes a lot of time and work since you have to produce excellent content, develop a solid network of backlinks, and ensure that your website is technically sound. Finally, it can be challenging to rank highly due to the intense rivalry in search engine rankings. However, if you have a firm grasp of SEO best practices and make a continuous, ongoing effort, you can make your website rank highly.

Do short blog posts hurt SEO?

Although a blog post’s length has no direct bearing on its SEO, lengthier content can be better for your website. A longer blog article might offer more information and specifics about a certain issue, which can help users see your website as a reliable resource for information. This can thus lengthen consumers’ stays on your page and reduce bounce rates, both of which are good things for search engines. Additionally, larger blog entries may give you more chances to use pertinent keywords, internal links, and external connections, which may help your SEO.

In conclusion, SEO is a crucial component of online marketing and greatly influences how visible, and popular your website is. You may efficiently raise the search engine ranking of your website and attract more targeted visitors by adhering to best practices and remaining current with the most recent trends and algorithms. Concentrating on producing high-quality, pertinent, and well-optimized content and constantly reviewing and modifying your plan as necessary, whether you’re just getting started or trying to improve your current SEO strategy. When used properly, SEO can be a potent tool for expanding your internet visibility and boosting commercial success.

Internet Marketing and SEO for Small Businesses

Internet Marketing and SEO for Small Businesses

Final Thoughts on SEO

Careful planning and perfect execution of that plan will ensure your success, so take your time throughout the process. Work smart, do your research, and KNOW your goal and how you plan to reach that goal. Don’t be afraid to ask family, friends, or professionals for advice or assistance, but remember you are the boss, so be the boss and make good, well-informed choices.

Summary

  1. Plan and Define Your Goals
  2. Build an Amazing User-Focused Site
  3. Create a Size 14 Digital Footprint
  4. Carefully Manage Your Online Presence
  5. Online Marketing Plan

Editors Notes:

Updated on 8/24/2018: Added Step 4 to include additional information that may benefit your SEO efforts.

Updated on 02/03/2023: Added Step 5, a “Bonus Step,” and “Unleashing the Power of SEO: The Ultimate Guide,” an SEO guide containing excellent information on what you should and should not be doing to ensure your website ranks on search engines. We have also added a sample internet marketing plan to help small businesses promote their website and business online.

Disclosure: You may find affiliate links to beneficial resources within this article. You won’t pay more for using our link, but we’ll get a commission. This supports our content creation, and we only suggest products we genuinely believe in. Thank you for being so understanding!

Affiliate Links

James Turner

James Turner

Author/Copywriter

Are you looking for a tech blogger and sales copywriter who can turn your message into a powerful tool for persuasion? Look no further than James Turner, a seasoned professional with over 25 years of experience in the tech industry. With a deep understanding of how to craft words that connect with readers and drive results, James is a master of the art of persuasive writing.

Why Choosing the Best Web Hosting Company Matters in 2025

Find out why choosing the best web hosting company matters in 2025 to boost your site’s performance and skyrocket sales.

Hiring a Website Designer

Hiring a website designer? Discover actionable tips, red flags to avoid, and how to find the right designer to create a website that grows your business.

How to Create a Landing Page Using WordPress

Follow our guide on how to create a landing page using WordPress and the built-in Block Editor, page builder plugins, or specialized themes.

My Island Designs

Pin It on Pinterest